How to run a sale on Shopify: Tips & video tutorials for bulk discounts
Save time during crunch time. Everything you need to know to schedule, publish, and end sales on Shopify.
There’s a reason online shopping feels like a thrill. Online shopping– particularly when discounted– gives customers a feeling of instant happiness and anticipation. Promotional sales create urgency, gamify shopping, and keep your brand top of mind.
Running a Shopify sale attracts new customers and encourages returning ones to buy again while saving money. Whether it’s Black Friday Cyber Monday (BFCM) or an anniversary sale, you can use strategic sales to drive orders and reach your revenue goals. Let’s take a step-by-step look at how to run a sale in Shopify and which type of promotion works best.
- How to show a sale price on Shopify
- How to do a bulk discount on Shopify
- How do you schedule a sale in Shopify?
- How do you create a sales collection in Shopify?
- 5 types of sales to run in Shopify
- Grow sales and cash flow with a promotional sale

How to show a sale price on Shopify
89% of shoppers say that inflation has made them prioritize value and turn to online shopping to compare prices. One of the most powerful visual tools you can use on your online store is the “compare-at price” function.
What is the compare-at price?
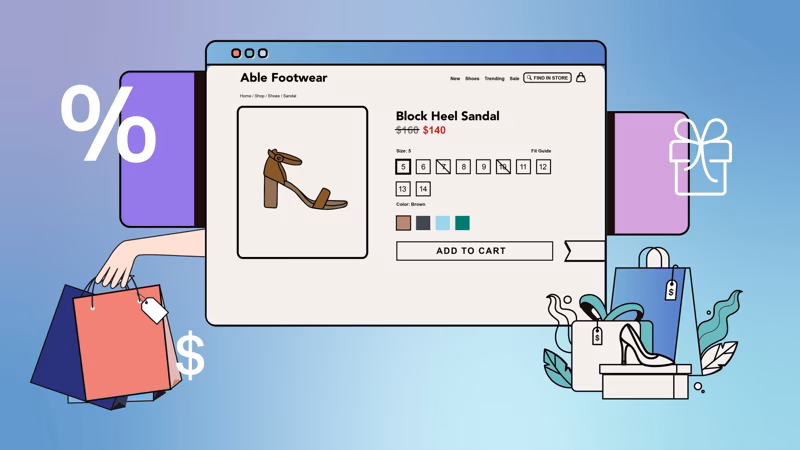
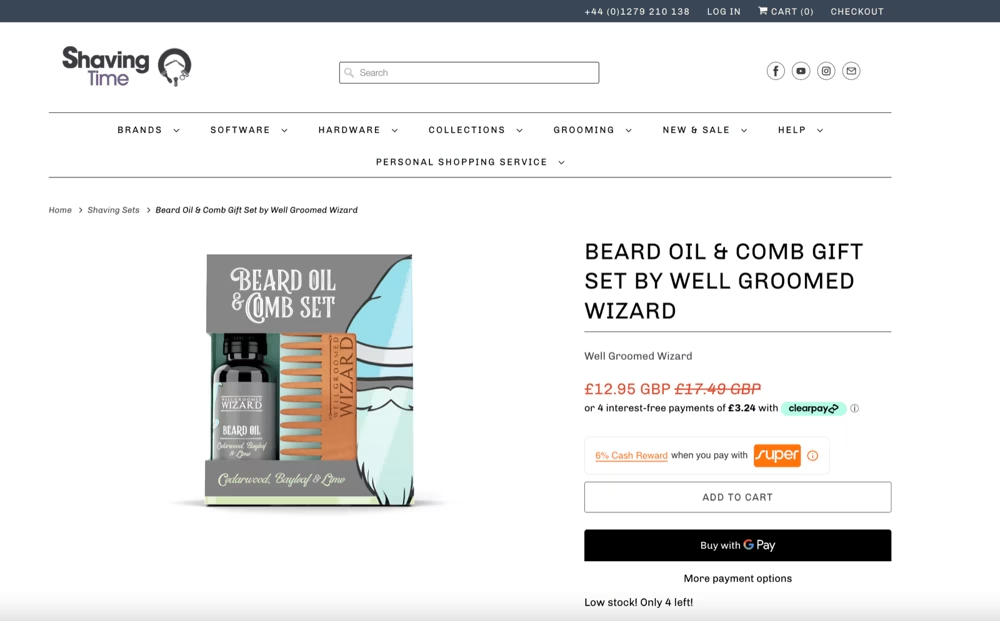
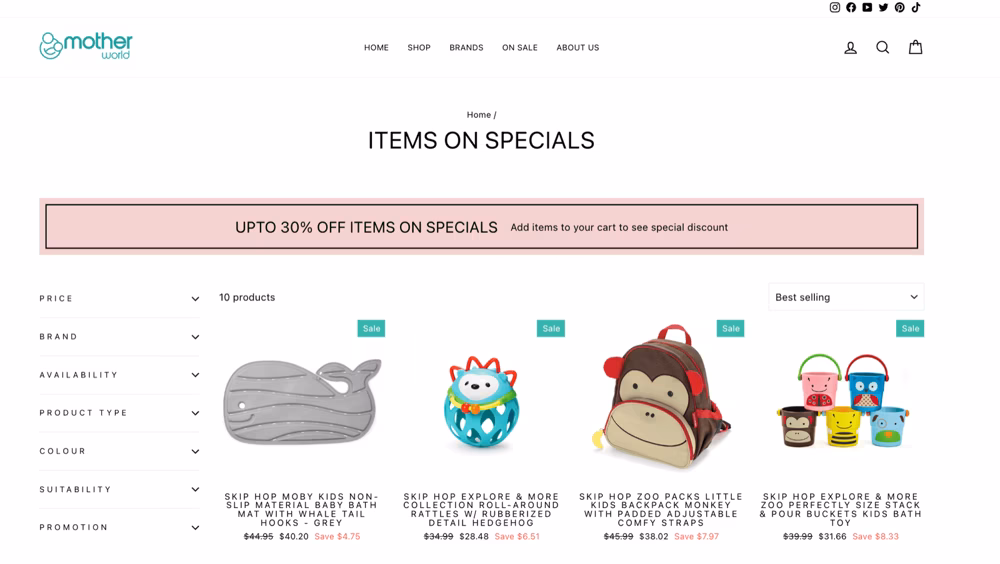
The compare-at price is the full price or MSRP of a product in Shopify. When paired with the discounted price (simply “price” in Shopify), customers can visualize the value of the discount.
The way this is displayed depends on your Shopify theme, but typically shows a strikethrough of the original price next to the discounted price. It may also put the old price in red, add a “sale” label to the item, or show the amount saved. This design feature draws visitors’ attention to the Shopify sale price and increases the perceived value.
You can edit the price and compare-at price under the pricing section for each individual product. To edit the compare-at price in bulk, skip down to our Ablestar Bulk Product Editor instructions.
How to do a bulk discount on Shopify
When you have hundreds or even thousands of products in your store, manual price updates are out of the question. To run a Shopify bulk discount efficiently, you need a bulk edit. One way to do this is through the Shopify Admin, and another way is using a third-party app.
Setting up a bulk discount in Shopify Admin
There are two ways to bulk edit prices within Shopify:
- Select the products you want to discount, then select the “bulk edit” option to change
- Upload a CSV file with your sales prices
You can view step-by-step directions for both in our bulk editing guide. While both options are free for any Shopify plan and take place in the familiar dashboard where you do everything for your store, there are some drawbacks.
- No ability to undo or preview edits. This makes it a little unnerving to update your entire catalog, and you can only cross your fingers and hope that you haven’t accidentally set a $99 product to $0.99.
- Manual price entry. Shopify also requires you to manually enter new prices in the spreadsheet or bulk editor, meaning you’ll need to run the calculations by hand or set up the discounts in Excel before uploading.
- No sale scheduling. In Shopify, you also don’t have the ability to quickly unpublish pricing changes or schedule sales to run. That means you might be sitting at your laptop at midnight trying to start or end a sale, which no one wants to do.
To add these extra safeguards and time-saving features, let’s look at how to run a sale on Shopify with Ablestar Bulk Product Editor.
Running an ecommerce sale with the Ablestar Bulk Product Editor app
The easiest way to seamlessly run a sale is with the Bulk Product Editor. Let’s walk step-by-step through how to set one up, how to set the compare-at price, and how to end a sale.
First, install Ablestar Bulk Product Editor, and it will sync your product data so you can edit it. Next, follow these steps to add your sale and compare-at prices:
- Open the Ablestar Bulk Product Editor app and click on “Start a new product edit."
- Filter for the products you want to edit then click on “Edit products."
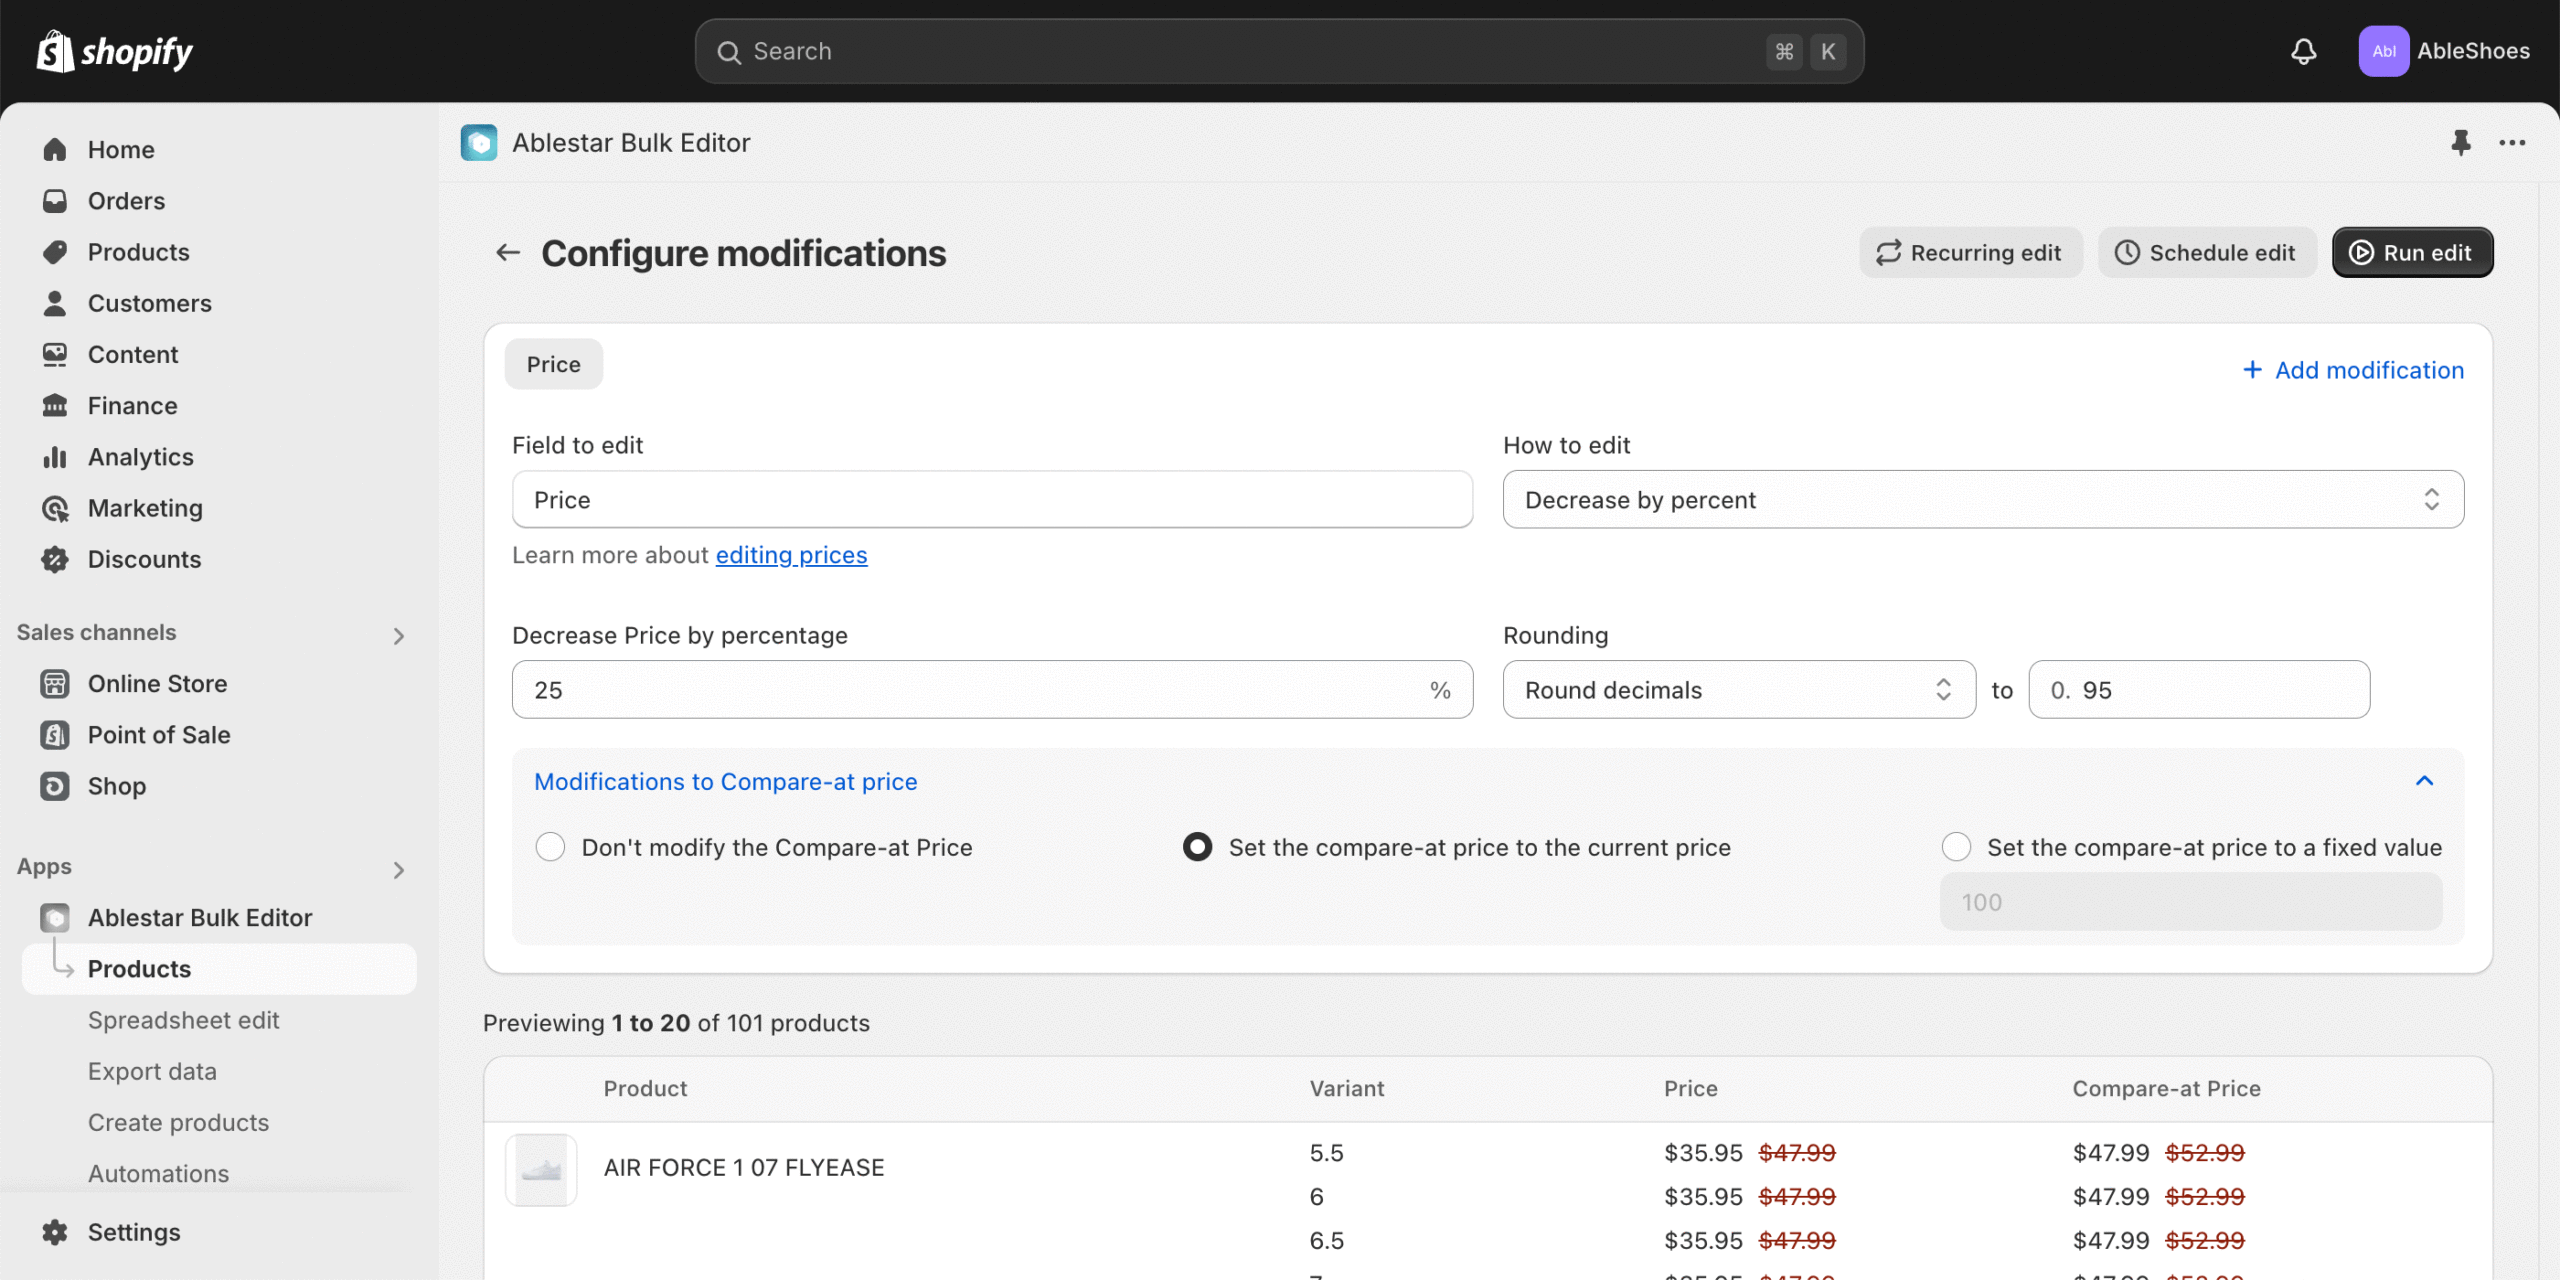
- Select “Price” as the field to edit.
- Choose the correct option under “How to edit”, for example, “Decrease by percent” or “Set to fixed value."
- To auto-discount prices, select “Decrease by percent” and enter the discount amount (eg. 10%).
- If you would like rounded prices, select “round decimals” under rounding and set the decimal value (eg. $0.99 if you want a 20% discount on a $10 item to default to $7.99 instead of $8).
- To modify the compare-at prices at the same time, click on “Compare-at price modifications” and choose the “Set compare-at price to current price” options.
- You can set the compare-at price to the current price or to a fixed value.
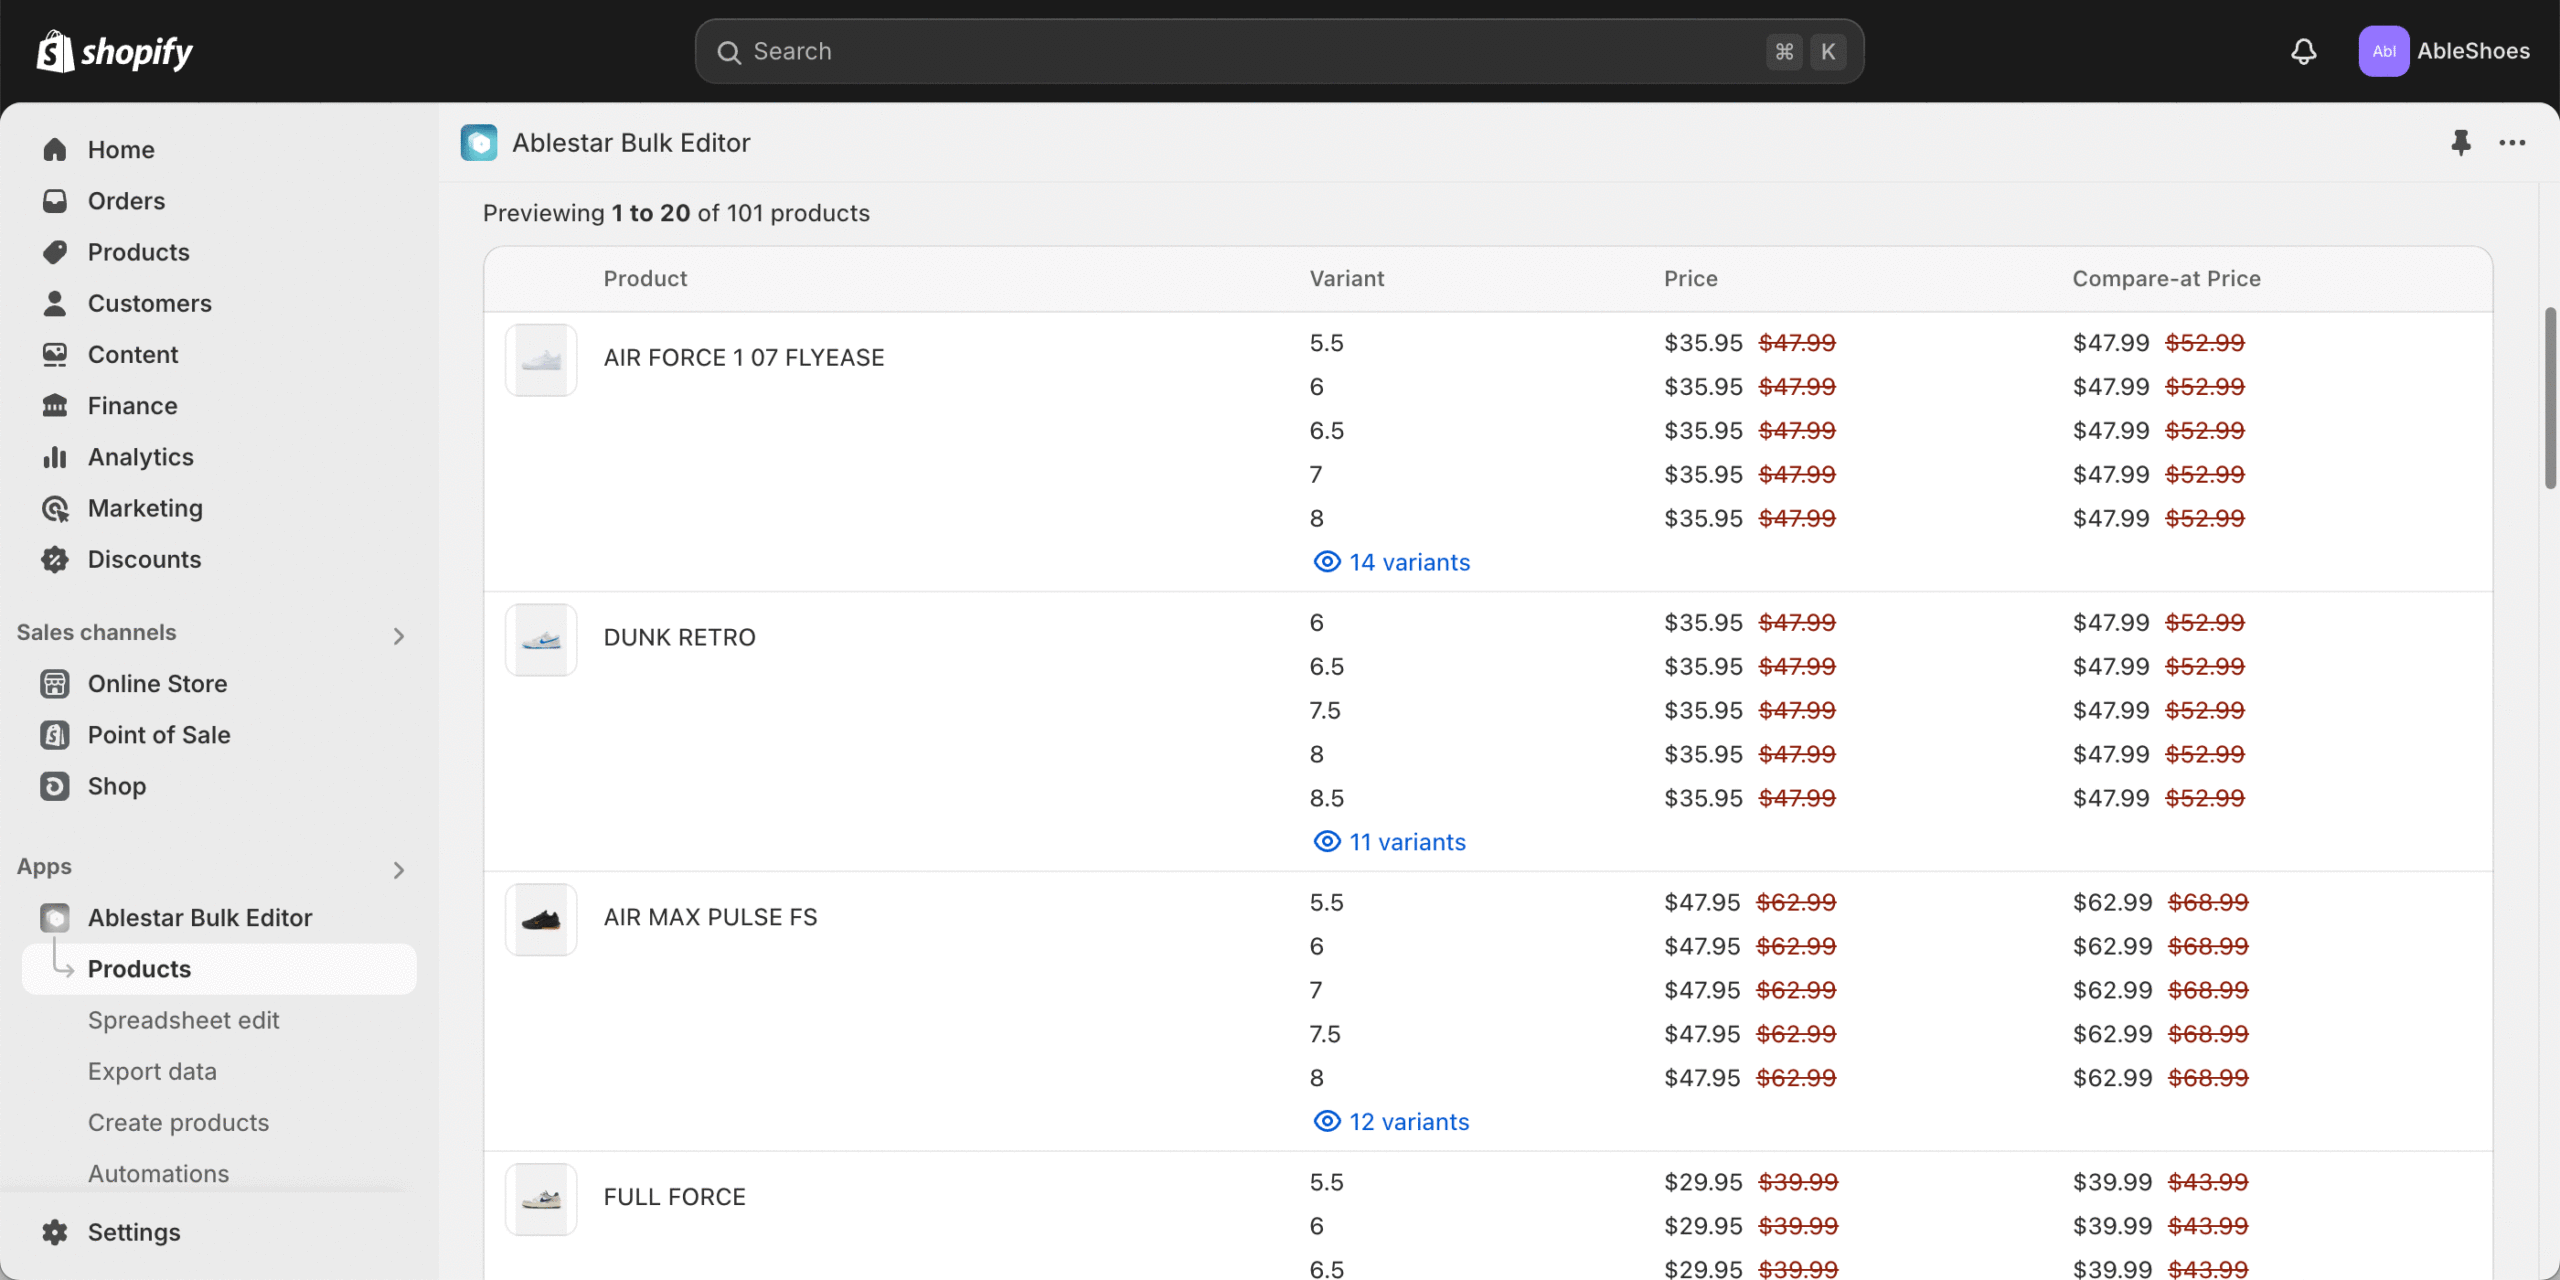
- Check your product previews below to ensure the prices and compare-at prices appear as intended.
- Click “Run edit” and watch the status of your updates as they process.
Another option in Ablestar Bulk Product Editor is to update your prices with a spreadsheet. To do this, set up a properly formatted Excel or CSV file with three columns. In the first, identify the product (by handle, title, or SKU), in the second, enter the new price, and in the third, enter your compare-at price. Upload the spreadsheet into the app to complete the bulk discount edit.
How do you end a sale in Shopify?
In Ablestar Bulk Product Editor, you have two options for ending a sale. First, you can simply hit “undo” for the bulk discount you created to revert all prices to the original ones. Easy, right? Second, you can run a new bulk price change to set all product prices back to 100% or another price that you choose.
To end a sale in Shopify Admin, you would need to complete a new bulk edit or manual edit to change the prices back to the original ones.
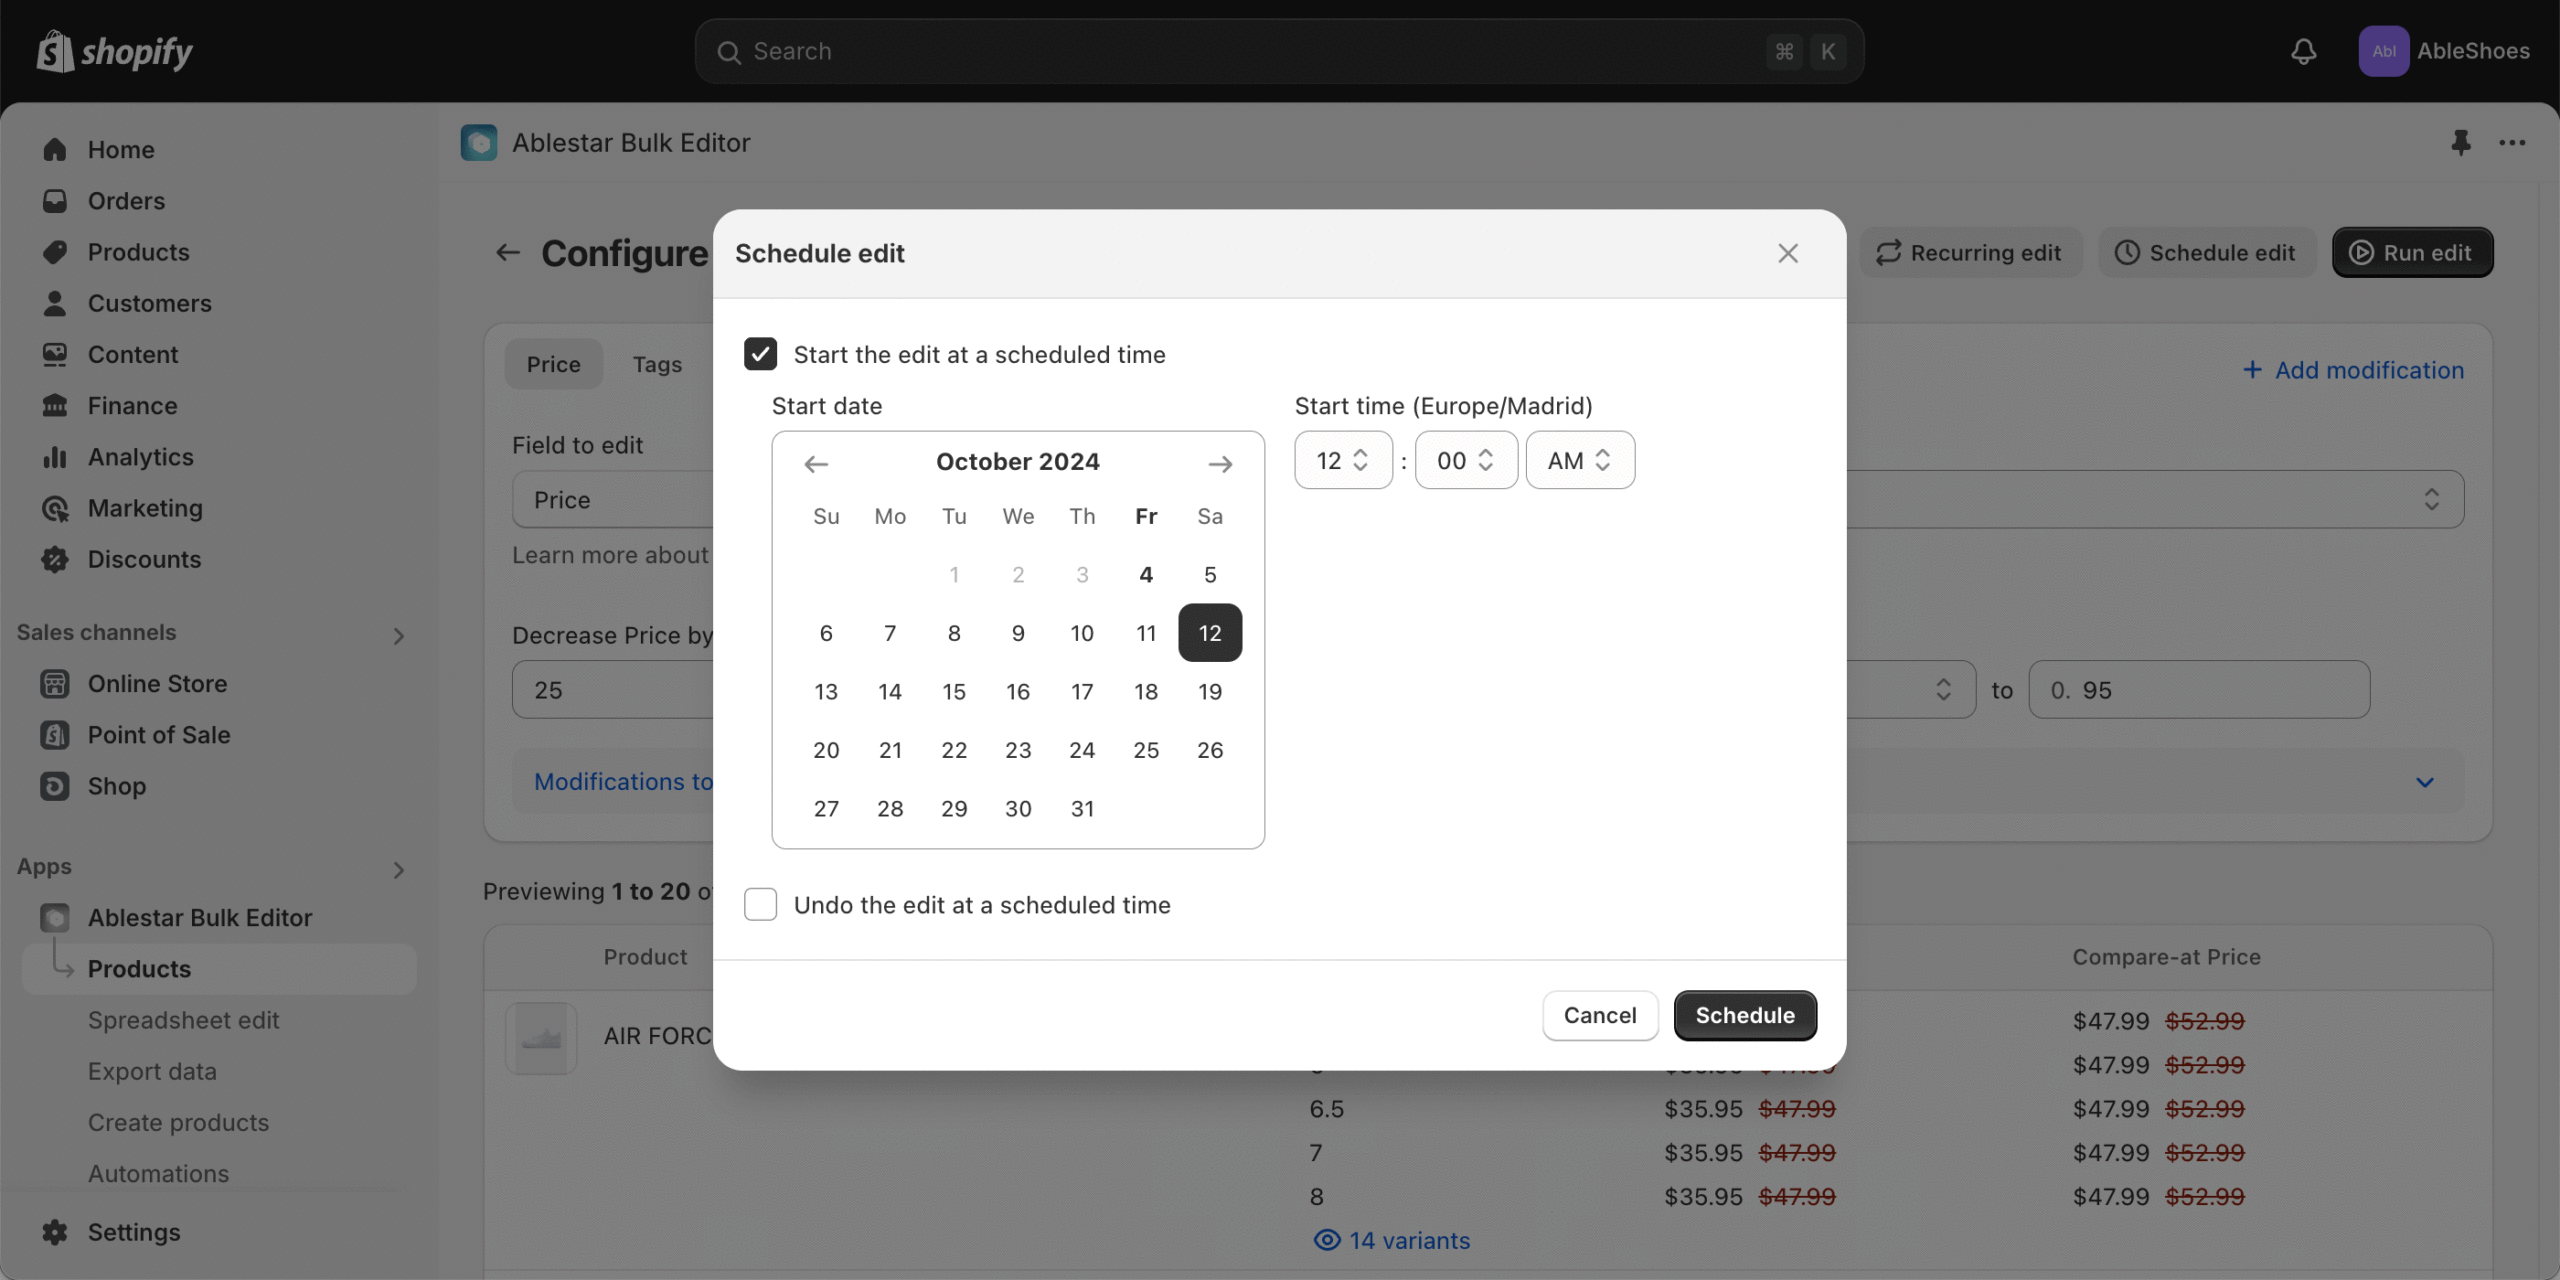
How do you schedule a sale in Shopify?
Scheduling a sale to start or end on Shopify is essential for running your business without being glued to your computer. When planning a sale, you should be able to schedule it, preview it, and end the sale automatically.
While this isn’t an option in Shopify Admin, you can schedule bulk discounts and price changes in the Bulk Editor App. Once you’ve configured your edit with the instructions above, instead of “Run now,” click “Schedule edit” for the start and end date you want.
How do you create a sales collection in Shopify?
One of the best ways to drive customers to your sale stock is to add a “Sale” or “Clearance” section on your website. This can be a permanent fixture on your navigation menu or can feature rotating seasonal sales such as “Fall Sale”.
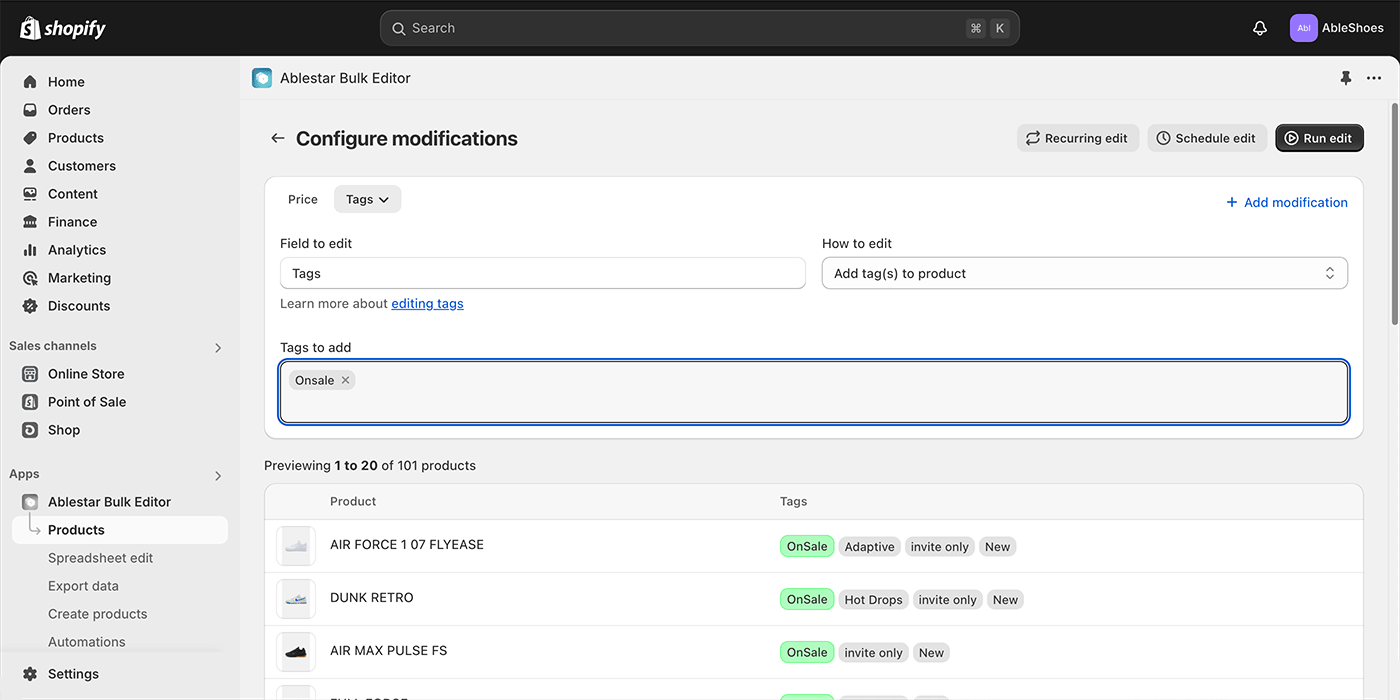
The easiest way to create a sales collection is through Shopify tags. Create a tag name such as “FallSale” to start. Then, choose how you’ll add the tag to your sale items:
- Manually add the item to each product in Shopify Admin
- Bulk edit your products in Shopify Admin to add tags
- If your items are already discounted, create a new bulk edit in Ablestar Bulk Product Editor to add sale tags
- If your products are not yet discounted, you can discount and tag your items at the same time in Ablestar Bulk Product Editor. After entering your price changes, click the + Add modification link to configure additional modifications including the tag.
When you’re done, add the sales collection to your navigation menu, and your collection is launched!
5 types of sales to run on Shopify
Ready to launch your first sale? Now that you know how to discount and bulk discount your products, you need to choose the type of sale to run. Here are six of our favorites with pros and cons for each.
1. Flash sale
Steep discounts, limited time only! Flash sales nudge indecisive shoppers to buy by playing on their FOMO, or fear of missing out. Small nuances, like adding a countdown timer for when your sale expires or showing how many people have an item in their cart, can add to the sense of urgency.
What we love
Flash sales are a quick win to move some merchandise and boost cash flow.
How to run a flash sale on Shopify
You can set up a flash sale by discounting anywhere from one product to entire collections in the Shopify Admin. To discount larger collections and schedule sales to publish and unpublish, use a bulk product editor.
If you’d like to add a countdown timer to your theme, we recommend Design Packs. This app provides over 180 high-quality sections that you can easily integrate into your theme.
2. Storewide sale
Storewide sales are perfect for holidays like BFCM and moving merchandise across all categories. Running a storewide sale doesn’t mean that you have to discount all items by the same amount. In fact, it’s smart to discount your top sellers by a smaller amount and your slow movers by a large amount.
What we love
In storewide sales, everyone wins by finding value somewhere. Customers avoid the frustration of looking for a specific item, only to find that it’s excluded from a sale.
How to run a storewide sale on Shopify
Edit all store prices by completing a CSV update or by running a bulk price edit in the Shopify Admin or Ablestar Bulk Product Editor.
3. Buy X, Get Y sale
Getting a free gift with a purchase or two-for-one has a powerful psychological effect. Running a bundle sale may actually be doing you a favor by clearing out stock that isn’t selling. You can also set a minimum purchase amount and add on free shipping or an extra discount as a reward. The extra perceived value may convince customers to buy from you versus somewhere else.
What we love
When you’re already sending a package to a customer, adding on a freebie or free shipping is a low-cost way to pack a lot of value.
How to run a Buy X, Get Y sale on Shopify
You can set up this type of sale on Shopify under “Discounts,” then “Buy X, Get Y”. You can choose a customer segment to qualify, a minimum quantity of items, or a minimum purchase amount. Designate specific products as your trigger item or reward.

4. Online coupons and discount codes
Sending online coupons to your members is a fantastic way to reward customer loyalty and incentivize customers to buy again. You can also nudge customers into your marketing funnel by sending discount codes when they sign up for your text or email list.
What we love
Text- or email-only discount codes feel exclusive and add to a sense of belonging. Engaging existing customers this way is much more cost-efficient than finding new ones.
How to set up discount codes on Shopify
Go to “Discounts” under your Shopify Admin and create the code that you want as a manual discount code. For detailed steps, follow the tutorial above.
5. Automatic discounts
One way to give customers some love is by automatically applying a discount to all qualifying items in a customer’s cart. An example of this is giving a value (eg. $10) or a percentage (eg. 20%) off an order. You can specify whether this discount applies to specific products, collections, or customers. You can also set a minimum purchase amount or minimum number of items to encourage larger orders.
What we love
Automatic discounts are easy for customers (no manual codes required!) and show them big value.
How to set up an automatic discount in Shopify
You can set up automatic discounts in the Shopify Admin under “Discounts,” then “Create a discount.” From the Select discount type menu, click “Amount off products” or “Amount off orders” and enter in your promotion details.
Grow sales and cash flow with a Shopify sale
Running a sale on Shopify gives shoppers that extra incentive to click “Add to cart” and keeps your inventory moving. Follow these best practices to make your sale a success.
- Use Shopify’s compare-at price feature to stop the scroll and showcase your value
- Consider which type of sales or promotion best fits your goals. While flash sales and storewide sales can bring in quick revenue, bundles and discount codes are good for customer loyalty and repeat purchases.
- Build a robust email list and social media presence to publicize your sale when it launches.
- Make sure that you’re prepared to handle an influx of orders from a fulfillment and customer service perspective. Sales can be a quick win, but customers won’t come back if you fumble their order.
- To manage your workflow, set up a system to bulk edit, schedule, and unpublish sales at set days and times. Invest your time in your products and customers, not staring at spreadsheets.
Need an easy way to bulk edit prices in Shopify? Save hours of manual updates with Ablestar Bulk Product Editor. Get started with the free version today.