

Updating Shopify from a spreadsheet: what CSV import overwrites and how to update only what you need
How Shopify's product and inventory CSV imports match and overwrite your data, how to update prices or stock from a supplier file that only has SKUs, and how to do it without blanking fields you didn't mean to touch.
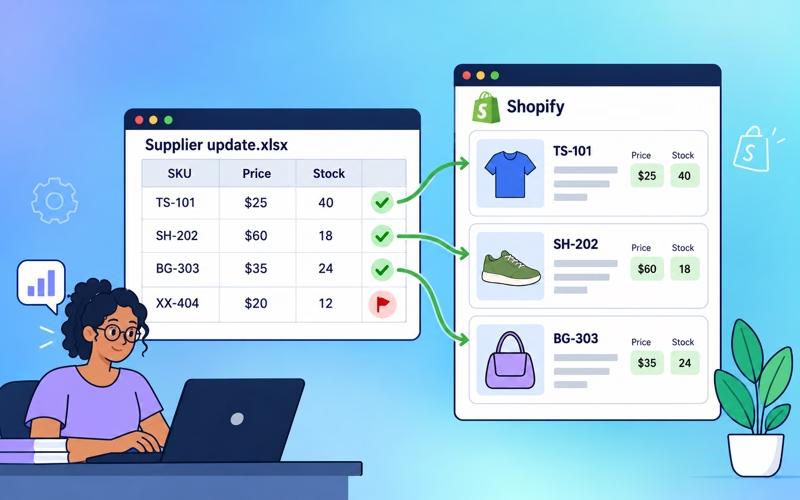
Shopify’s product CSV import matches rows to products by URL handle only, and with Overwrite products with matching handles selected it replaces every column in your file, including empty cells, which become blanks. That works if you start from a Shopify export. It doesn’t work well for the file you actually get from a supplier, which usually has a SKU and a new price or stock number and nothing else. For that you either rebuild the file around Shopify’s handles, use the separate inventory CSV for stock, or use an app that matches rows by SKU or barcode.
This guide explains how both of Shopify’s imports decide what to change, how to update prices and stock from a SKU-only file, and the spreadsheet mistakes that cause most bad imports.
How Shopify’s product CSV import decides what to change
A few rules decide what happens to your products when you import a file:
- Rows match by URL handle. When a handle in the file matches an existing product, the values in the file overwrite that product’s values. Shopify doesn’t use SKU or barcode to find products, and the file has no variant ID column.
- Variants are found by their option values. The first variant goes on the product’s row and each other variant gets its own row with the same URL handle and its option values. Change an option value and Shopify treats it as a different variant.
- Only two columns are required for updates: URL handle and Title.
- A column that isn’t in the file is left alone. A column that’s in the file with an empty cell overwrites that field with a blank.
- The file has to be a UTF-8 CSV, up to 15 MB. Shopify doesn’t import Excel files directly.
In 2026 the price columns in Shopify’s template are called Price, Compare-at price, and Cost per item, and the barcode column takes up to 20 barcodes per variant. Shopify still accepts older column names, but don’t mix an old and a new column for the same field in one file.
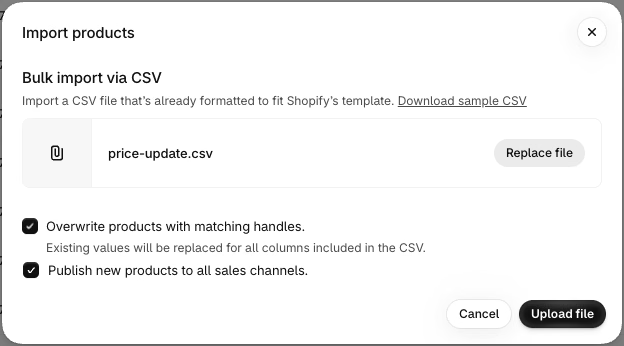
The safe pattern follows from these rules: start from a fresh export, keep only URL handle, Title, the option columns, and the columns you’re changing, and make sure the columns you’re changing have no empty cells. (Variant rows in an export have an empty Title. That’s normal, because Shopify reads product fields from the first row of each product.)

Updating prices from a supplier file with only SKU and price
Supplier price lists rarely have Shopify handles. Here’s how to turn one into a file Shopify can import.
Export your products. In Products, click Export, choose All products (or the products from that supplier), and Plain CSV file.
Open the export next to the supplier file. Put the supplier’s SKU and price columns on a second sheet, say
Supplier, with SKU in column A and the new price in column B.Look up the new price by SKU. Add a column to the export with a lookup. If your SKU is in column D and the current price in column E:
=IFERROR(XLOOKUP(D2, Supplier!A:A, Supplier!B:B), E2)The
IFERRORpart keeps the current price when the supplier file doesn’t have that SKU, so you never import an empty price.Copy the results over the Price column as values, not formulas.
Delete every column you aren’t changing. Keep URL handle, Title, the option name and value columns, and Price.
Check the file. Sort a copy (not the file you’ll import) by price and look at the lowest and highest values. A misplaced decimal or a cost price in the wrong column shows up here.
Import it with Overwrite products with matching handles selected.
The same approach works for any formula-based change. A few useful ones, with the current price in E2 and cost in C2:
| Change | Formula |
|---|---|
| Raise prices by 8% | =ROUND(E2*1.08, 2) |
| Round up to end in .99 | =ROUNDUP(E2, 0)-0.01 |
| Price at a 40% margin on cost | =ROUND(C2/(1-0.4), 2) |
| Set compare-at to the current price (for a sale) | =E2 in the Compare-at price column |

Updating stock from a supplier file
Stock goes through a different import. Go to Products > Inventory, export, change the file, and import it again. It has its own rules:
- Rows are identified by handle, location, and option values. The SKU column is there for reference. Shopify doesn’t use it to find the variant or update it. So a supplier file with only SKU and quantity still needs to be matched to your export, the same way as prices.
- Quantities are set, not adjusted. Put the new number in On hand (new). Leave a cell empty to keep that quantity as it is.
- There’s a safety check. Shopify compares the On hand (current) column with your current stock. If stock changed after you exported (because of an order, for example), those rows don’t import and you get an email. Clear the column to turn the check off.
- One row per location. Location names have to match exactly, including capital letters.
Files that arrive every day
Many suppliers send a stock or price file on a schedule, by email, FTP, or a link that always has the latest version. Shopify has no built-in way to import a file on a schedule or from a URL. Shopify Flow has a scheduled trigger and can make HTTP requests on the Grow plan and up, but reading a supplier file and updating variants with it is custom development. Stocky, Shopify’s old inventory app, was removed in 2026.
So scheduled supplier updates need an app. There are dedicated inventory sync apps, and Bulk Product Editor can do it as part of its spreadsheet edits (see below).
Spreadsheet mistakes that break imports
Most bad imports come from the spreadsheet program, not from Shopify:
- Long numbers turn into scientific notation. Excel shows a 13-digit barcode as
9.78E+12and saves it that way. Format barcode and SKU columns as text before you paste data in. - Leading zeros disappear. The same text formatting keeps
00123from becoming123. - The file isn’t UTF-8. Accented letters and symbols break if the file is saved with another encoding. Google Sheets always exports UTF-8. In Excel, choose CSV UTF-8.
- Sorting splits variant and image rows. Shopify warns that a file sorted in Excel or Numbers can lose a product’s images, because the image rows no longer sit under their product. Sort a copy if you need to check values.
- Blank rows at the end of the sheet. Formatting a whole column can leave thousands of empty rows in the file, which makes it larger and slower.
Doing it with Bulk Product Editor
Ablestar Bulk Product Editor takes the supplier’s file as it is, so you don’t have to rebuild it around handles.
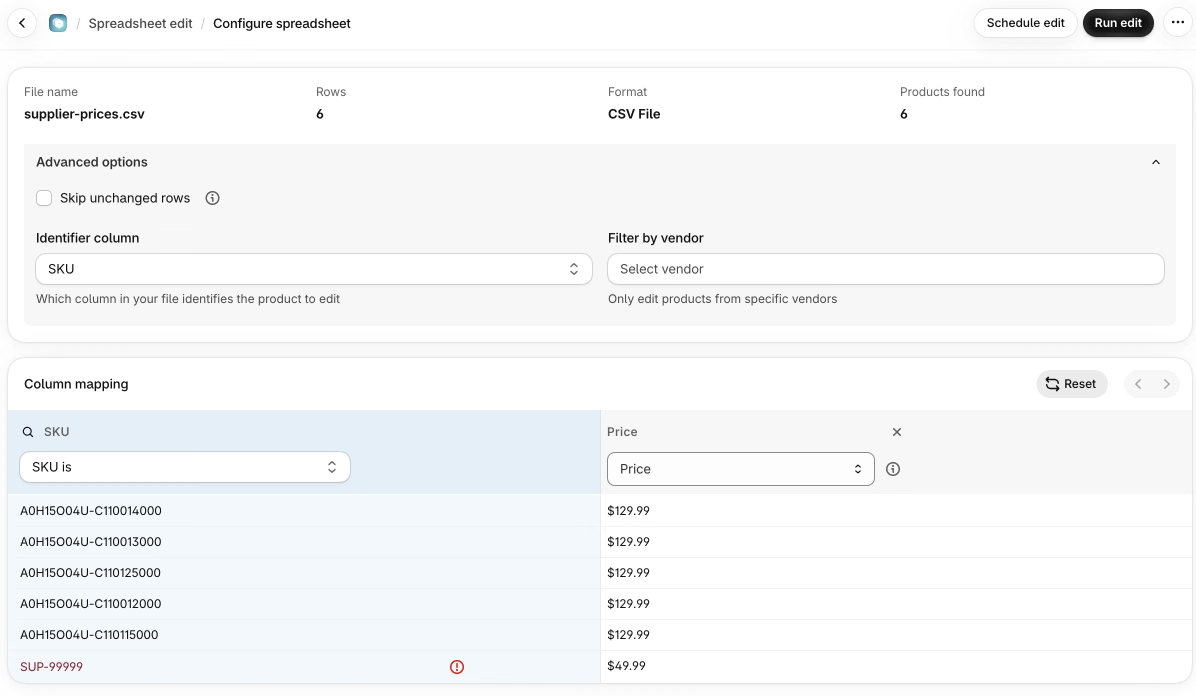
- In the app, click Spreadsheet edit and upload a CSV or Excel file.
- The app maps columns to fields by their names. Check the mapping and change any column that’s wrong.
- Under Advanced options, set Identifier column to the column that identifies the variant: SKU, Barcode, or Variant ID (or a handle for product-level changes).
- Click Run edit, or Schedule edit to run it later.
How it treats your file:
- Only mapped columns change. Everything else on the product stays the same.
- An empty cell leaves the field as it is. The exceptions are compare-at price and market price columns, where an empty cell removes the value, so you can end a sale with a file.
- Rows that match no product are counted and can be downloaded, which catches typos and new products from the supplier. Partial products shows products where the file only had some of the variants.
- Skip unchanged rows skips rows where nothing is different, which makes large files faster.
- Every spreadsheet edit can be undone, and Download log gives you the old and new value for every change.
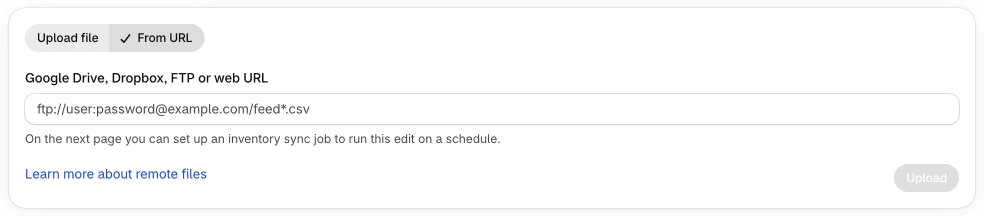
For files that arrive on a schedule, choose From URL instead of uploading. The app reads the file from Google Drive, Dropbox, FTP, or a web link, and after you map it once you can set it up as an inventory sync that runs on a schedule. Inventory sync is on the Advanced plan (5 jobs) and the Professional plan (10 jobs).
You can also edit market prices with a spreadsheet and export products to CSV, Excel, or Google Shopping formats. See all plans for what each plan includes.

Before you import
- Export first and keep the file. It’s your way back.
- Remove every column you aren’t changing.
- Look for empty cells in the columns you’re importing.
- Check the lowest and highest values in number columns.
- Try the file with two or three products before the full import.
- Keep a copy of the supplier’s original file next to your import file.
Frequently asked questions
Can I update Shopify products by SKU with a CSV file?
Not with Shopify’s own imports. The product CSV matches by URL handle, and the inventory CSV matches by handle, location, and option values. To use a SKU-only file you either match it to a Shopify export with a lookup formula or use an app that matches by SKU.
Can I import an Excel file into Shopify?
No, Shopify only imports CSV files with UTF-8 encoding. Save the sheet as CSV UTF-8 in Excel, or export it as CSV from Google Sheets. Bulk Product Editor accepts both CSV and Excel files.
Why did my CSV import blank out some fields?
Because the file had those columns with empty cells. With overwrite selected, an empty cell in a column replaces the product’s value with a blank. Remove the columns you aren’t changing before you import.
Can Shopify import a supplier file automatically every day?
Not natively. There’s no scheduled or URL import in Shopify. You need an inventory sync app, a custom Flow workflow, or a bulk editor that can load a file from a URL on a schedule.
Related articles
Can you undo a bulk edit in Shopify? How to recover and how to make bulk changes safely
Written by Ablestar

Timed sales on Shopify: compare-at prices vs automatic discounts vs scheduled price changes
Written by Ablestar

Why Shopify shows the wrong images when a shopper picks a variant (and how to fix it)
Written by Ablestar